All about Polygon Edge
To get started by running a polygon-edge network, please read the whole blog.
Hello! I am pranjali. I write about Cloud & DevOps.
Polygon Edge is a modular and extensible framework for building Ethereum-compatible blockchain networks, written in Golang.
In this guide, our goal is to establish a working polygon-edge blockchain network working with IBFT consensus protocol.
To achieve that, we will guide you through 4 easy steps:
Before starting one question popped up in my mind:
Why go custom?
There are plenty of reasons why teams would want to spin up a custom blockchain network to accommodate their apps.
Having custom blockchain networks allows teams to configure essential parameters, such as which consensus is used, what is the block limit for transactions, who are the trusted participants in the network (validators), and much more.
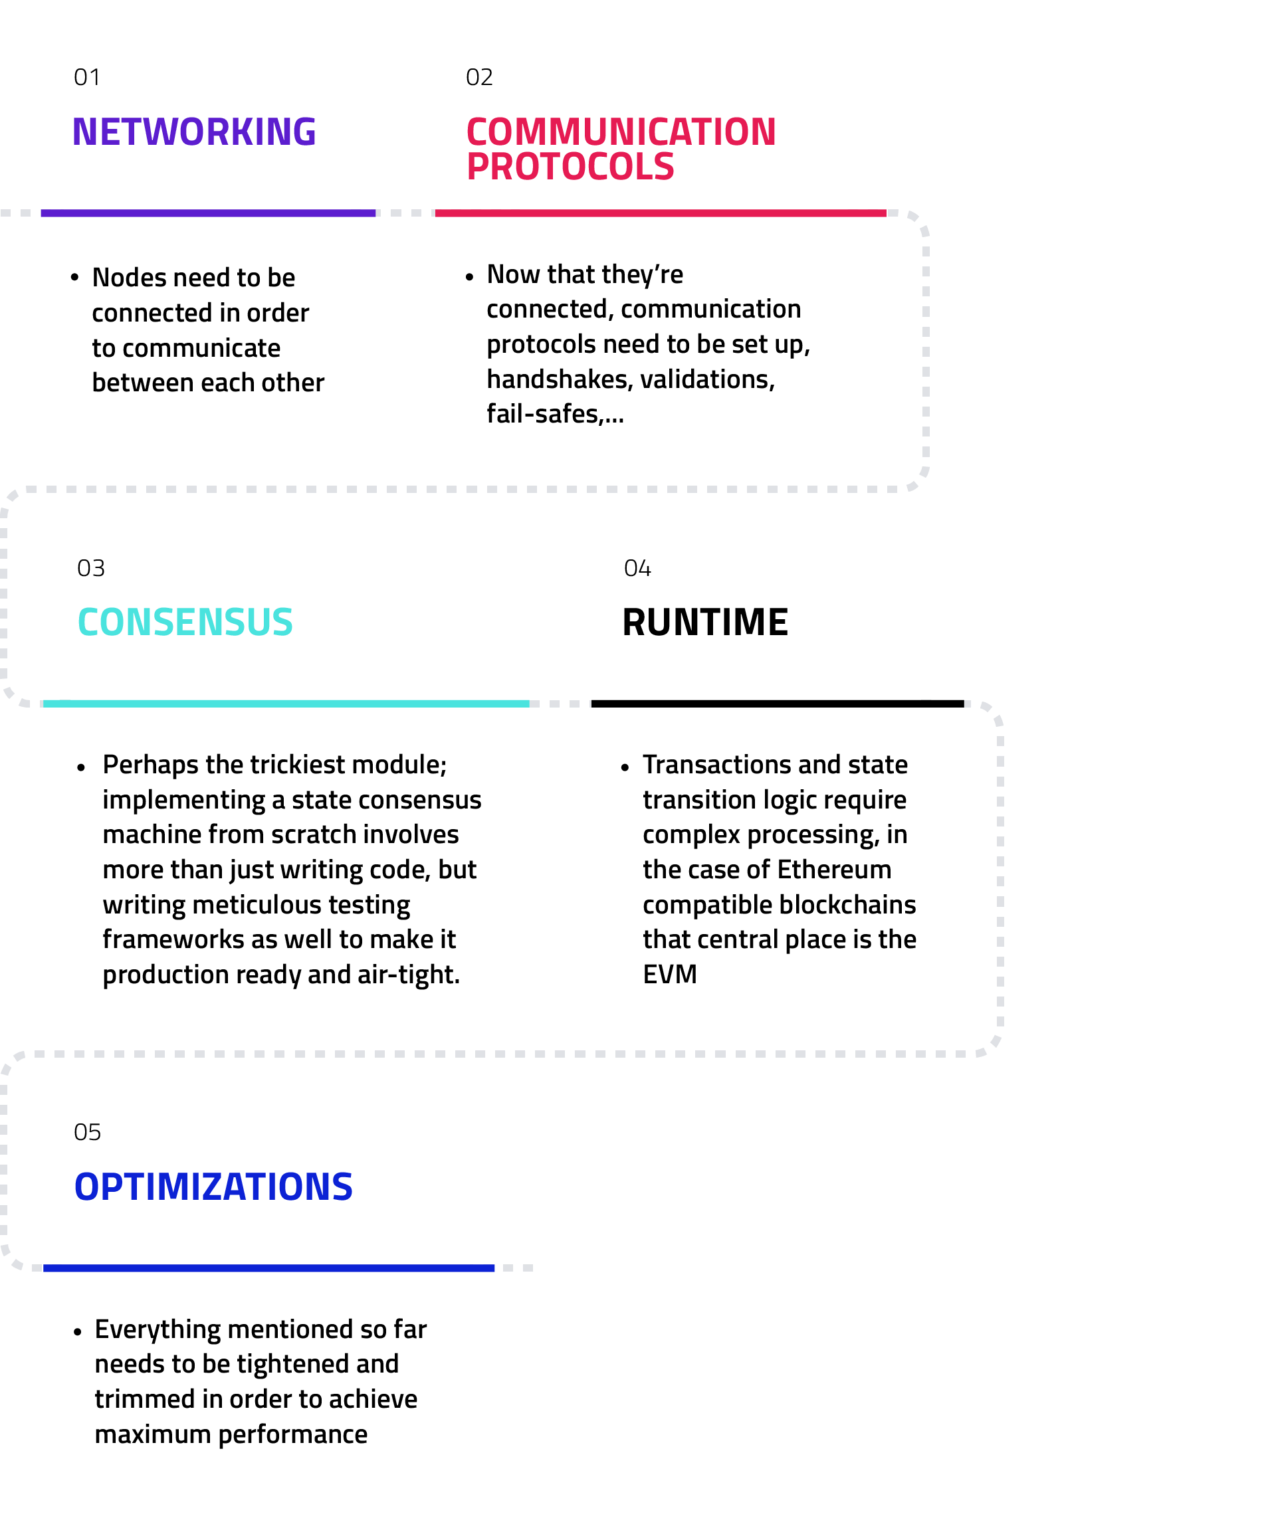
Architecture Of Polygon-Edge
Edge is one of the most recent protocols released by Polygon. It is a modular and extensible framework for building private or public Ethereum-compatible blockchain networks, sidechains, and general scaling solutions.

How do you set up a Polygon edge?
The below guide will instruct you on how to set up a Polygon Edge network on a cloud provider for a production setup of your testnet or mainnet.
Requirements:
1- Install the “go” latest version.
Note- make sure that you have Go installed and properly configured.
2- Install Polygon-edge
Building from source:
1- https://github.com/0xPolygon/polygon-edge.git
2- cd polygon-edge/
3- go build -o polygon-edge main.go
4- sudo mv polygon-edge /usr/local/bin
Setting up the VM connectivity:
Depending on your choice of cloud provider, you may set up connectivity and rules between the VMs using security groups, or access control lists.
In this guide, our goal is to establish a working polygon-edge blockchain network working with IBFT consencus protocol. The blockchain network will consist of 4 nodes of whom all 4 are validator nodes.
Each of the 4 nodes will run on their own VM.
To achieve that, we need to follow only 4 easy steps:
1- Generate the private keys for each of the validators, and initialize the data directory.
2- Prepare the connection string for the bootnode to be put into the shared genesis.json
3- Create the genesis.json on your local machine, and send/transfer it to each of the nodes.
4- Start all the nodes.
Step 1: Initialize data folders and generate validator keys.
To get up and running with Polygon Edge, you need to initialize the data folders, on each node:
node-1> polygon-edge secrets init --data-dir test-chain-1
node-2> polygon-edge secrets init --data-dir test-chain-2
node-3> polygon-edge secrets init --data-dir test-chain-3
node-4> polygon-edge secrets init --data-dir test-chain-4
NOTE:- Each of these commands will print the validator key, bls public key, and the node id.
Step2: Prepare the multiaddr connection string for bootnodes.
Bootnode is not a special instance of a Polygon Edge node. Every Polygon Edge node can serve as a bootnode.
To create the connection string for specifying the bootnode, we will need to conform to the multiaddr format:
/ip4/<ip_address>/tcp/<port>/p2p/<node_id>
As the first part of the multiaddr connection string is the <ip_address>, here you will need to enter the IP address as reachable by other nodes, depending on your setup this might be a private or a public IP address, not 127.0.0.1
For the <port> we will use 1478, since it is the default libp2p port.
e.g.
/ip4/<public_or_private_ip>/tcp/1478/p2p/16Uiu2HAmJxxH1tScDX2rLGSU9exnuvZKNM9SoK3v315azp68DLPW
Step 3: Generate the genesis file with the 4 nodes as validators.
This step can be run on your local machine, but you will need the public validator keys for each of the 4 validators.
Validators can safely share the Public key (address) as displayed below in the output to their secrets init commands
Given that you have received all 4 of the validators’ public keys, you can run the following command to generate the genesis.json
polygon-edge genesis ibft --ibft-validator 0x6953bcjhdbchdvcghvcvghv:vhgvghdcvghecdggcxgcxgcsgfcxgfcsfxsgfcxgfscxfg --ibft-validator <2nd validator IBFT public key>:<2nd validator BLS public key> --ibft-validator <3rd validator IBFT publickey>:<3rd validator BLS public key> --ibft-validator <4th validatorIBFT public>:<4th validatorBLS public key> --bootnode <first bootnode multiaddr connection string> --bootnode <second bootnode multiaddr connection string> --bootnode <more bootnode>
Step 4: Run all the clients
node-1> polygon-edge server — data-dir ./test-chain-1 — chain genesis.json — libp2p 0.0.0.0:1478 — nat <public_or_private_ip> — seal
node-2> polygon-edge server -data-dir ./test-chain-2 genesis.json — libp2p 0.0.0.0:1478 — nat <public_or_private_ip> — seal
node-3> polygon-edge server -data-dir ./test-chain-3 genesis.json — libp2p 0.0.0.0:1478 — nat <public_or_private_ip> — seal
node-4> polygon-edge server -data-dir ./test-chain-4 genesis.json — libp2p 0.0.0.0:1478 — nat <public_or_private_ip> — seal
That’s it!

After all of the nodes are started, they will attempt to form a fully-meshed network and start producing blocks.

